
Fixing a leaky roof on your mobile home is crucial. If you ignore it, water damage can spread, leading to more significant problems like mold and structural damage. The good news? You don’t have to spend a lot of money to fix it. Let’s explore how to tackle roof leaks without emptying your wallet. It’s all about smart, affordable fixes that keep your home safe and dry.
1. Use Roof Sealants
Roof sealants are a go-to fix for leaks. They come in types like silicone, acrylic, and polyurethane. Each has its perks. Silicone fights off sun damage and lasts long. Acrylic is eco-friendly and cost-effective. Polyurethane is excellent for high-traffic areas because it’s tough.
Before you start, clean your roof. Remove any debris and dirt. A clean surface makes sure the sealant sticks well. Now, choose your sealant. Apply it carefully over the leaky spots. Use a brush or roller. Make sure to cover the areas well, but don’t overdo it. Follow the product’s instructions for the best results. This simple step can seal up leaks and protect your roof.
2. Install Peel-and-Stick Roofing
Peel-and-stick roofing is like a big, waterproof sticker for your roof. It’s a membrane that’s easy to put on and sticks to your roof, keeping water out.
Here’s how you do it:
- Know how much material you need by measuring your roof.
- Your roof must be clean. Sweep off any debris and dirt.
- Start at one end. Peel off the backing to reveal the sticky side.
- Carefully place it on your roof. Start from the bottom and work your way up. Make sure it’s straight.
- Press it down firmly. Use a roller to remove any air bubbles.
- Overlap edges by at least an inch for a watertight seal.
This method is a solid way to cover up leaks. It’s durable and does a great job of waterproofing your roof. Plus, you can do it yourself, saving money on repairs.
3. Apply Roofing Tape
Roofing tape is like a superhero for small leaks. It’s firm, sticky, and stretches to cover cracks and seams. Why use it? It’s quick and doesn’t cost much. Plus, it can stop leaks right away.
Here’s how to use it right:
- Clean the area around the leak. The tape sticks better to a clean surface.
- Cut a piece of tape. Make sure it’s bigger than the leak.
- Peel off the backing. Stick the tape over the leak. Press down firmly.
- Smooth out any bubbles. This helps make sure the seal is tight.
With roofing tape, you can fix leaks fast. It’s a handy solution until you can do a more extensive repair.
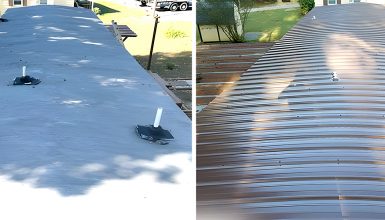
4. Patch with Metal Sheets
Metal patches are perfect for fixing leaks on metal roofs. They’re sturdy and last a long time. Use them when you have holes or rust damage.
To install a metal patch, follow these steps:
- Measure the damaged area. Cut a metal sheet that’s a bit larger than the leak.
- Clean the roof around the leak. This helps the patch stick better.
- Apply roofing sealant on the back of the patch.
- Place the patch over the leak. Press down to stick it to the roof.
- Secure the patch with roofing screws. Make sure they’re spaced evenly.
- Seal around the edges of the patch with more sealant. This keeps water out.
Patching with metal sheets is a durable fix. It can make your roof strong again in no time.
5. Use Rubber Coating
Rubber coating is a fantastic choice for covering larger roof areas. It’s like painting your roof with a waterproof layer. This coating stretches so it can handle temperature changes without cracking. It’s also great at blocking water.
Here’s how to apply it:
- Start with a clean roof. This means no dirt, moss, or debris.
- Stir the rubber coating well before you start.
- Use a roller or brush to apply it. Make sure you cover the whole area evenly.
- Apply multiple layers if the instructions say so. Let each layer dry before adding another.
Rubber coating stops leaks and adds extra protection against the elements.
6. Tarps as a Temporary Solution
Tarps are a quick fix when you need to stop a leak. They’re not a permanent solution, but they can save your home from water damage until you can do proper repairs.
To use a tarp correctly:
- Choose a tarp that’s big enough to cover the leaky area, plus a bit more.
- Secure the tarp to your roof. Use strong ropes or bungee cords. Tie them to something sturdy like the base of a chimney or roof vents.
- Make sure the tarp is flat and tight against the roof. This prevents water from pooling.
- Check the tarp after storms to ensure it’s still secure.
Remember, tarps are just a temporary fix. They buy you time until you can properly repair the roof.
