
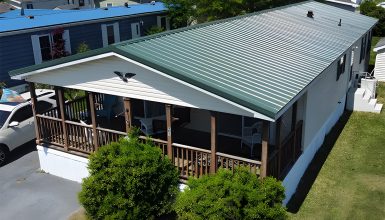
Are you looking to breathe new life into your old mobile home? Get ready to be inspired! Installing a metal roof is a game-changer that offers style and practicality rolled into one. With benefits like energy efficiency, durability, and a fresh new look, it’s time to roll up your sleeves and transform your mobile home into a head-turner. Let’s embark on this exciting journey together and explore the ins and outs of metal roofing for your beloved abode!
Assess the current condition
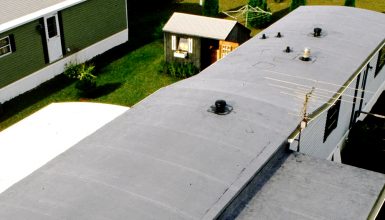
Hold on, before we jump into the world of metal roofing, let’s take a step back and assess your mobile home’s current condition. After all, a solid foundation is crucial for a successful roofing project.
First things first, grab a ladder and carefully inspect your existing roof. Look for any signs of damage, such as leaks, rot, or sagging areas. Note any issues you spot, as you’ll want to address these before moving forward with your metal roof installation.
Next, look inside your mobile home for water stains or mold on the ceilings or walls. This could indicate a leaky roof that needs attention. While at it, check the insulation and ventilation system to ensure your home stays cozy and energy-efficient.
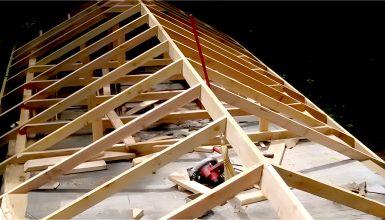
Finally, take a good look at the overall structure of your mobile home. Are there any weak spots or signs of decay in the framing? If so, you’ll want to repair or replace these elements to make sure your new metal roof has a solid and sturdy foundation to rest on.
Check local building codes and permits
Now that you’ve assessed your mobile home’s condition, it’s time to do homework on local building codes and permits. Trust us. This step is crucial for ensuring your metal roof installation goes off without a hitch!
You see, each city or county has its rules and regulations for construction projects, including roofing. So, before you start hammering away, take a moment to research the specific codes and requirements in your area. You can usually find this information on your local government’s website or by calling them.
Once you’ve got the scoop on the regulations, secure any necessary permits for your project. Remember that skipping this step could lead to fines or even the need to remove your brand-new metal roof. Yikes!
So, do yourself a favor and complete all the paperwork before you begin. By complying with local codes and having the proper permits, you’ll be well on your way to a stress-free, successful metal roof installation.
Choose the right material
So, you’ve checked the condition of your mobile home and got your permits sorted – great job! Now comes the fun part: choosing the perfect metal roofing material for your project.
With so many options on the market, finding the one that suits your needs and style is essential. Let’s explore three popular metal roofing materials to help you make an informed decision:
- Aluminum
Lightweight and rust-resistant, aluminum is a fantastic choice for those living in coastal areas or harsh weather conditions. Plus, its naturally reflective properties can help keep your mobile home cool and energy-efficient. The only downside? Aluminum can be a bit pricier than other options.
- Steel
A crowd favorite, steel is both affordable and durable. It can withstand the test of time, making it an excellent long-term investment. And with various colors and finishes available, you can customize your steel roof to match your style. Just keep in mind that steel may require a bit more maintenance to prevent rust in certain climates.
- Copper
If you’re looking to make a statement, copper is the way to go. This stunning, high-end metal adds a touch of elegance to any home. Over time, copper develops a unique patina with a beautiful, aged appearance. But be prepared – this premium material comes with a premium price tag.
As you consider these options, think about factors like cost, weight, and durability. Remember, the best choice for you is the one that fits your budget, complements your mobile home’s design, and holds up well in your local climate.
Tools and materials
Now that you’ve picked the perfect metal roofing material, it’s time to gather all the tools and materials you’ll need for the installation. Having everything ready and organized will make the process smoother, faster, and more enjoyable. So, let’s roll up our sleeves and get started!
Here’s a list of essential tools you’ll need for your metal roof installation:
- Drill: For fastening screws and drilling pilot holes.
- Hammer: For securing nails and other fasteners.
- Tin snips and metal shears: For cutting and trimming your metal panels.
- Tape measure: For accurate measurements and proper panel placement.
- Level: To ensure your panels are perfectly straight and aligned.
- Chalk line: For marking guidelines on the roof.
- Ladder: To safely access your roof.
In addition to the tools, you’ll also need the following roofing materials:
- Metal panels: The star of the show! Make sure you have enough panels to cover your entire roof.
- Screws or nails: To secure the metal panels to your roof.
- Flashing: To seal and protect areas around vents, pipes, and chimneys.
- Underlayment: A barrier between the metal panels and your roof sheathing.
- Sealant: For sealing seams and fasteners, ensuring a watertight roof.
Installing a metal roof on an old mobile home
Here’s a step-by-step guide to help you install a metal roof on your old mobile home:
Step 1: Install underlayment
With your tools and materials ready to go, it’s time to lay the groundwork for your shiny new metal roof. That means installing an underlayment – a crucial component that protects your mobile home from water damage and ensures your metal roof performs at its best.
Here’s a step-by-step guide to installing the underlayment:
- Clear the deck: First, remove any old roofing materials, such as shingles, and clean the roof surface. You want a nice, clean slate to work with.
- Choose your underlayment: There are two common types of underlayment – synthetic and felt. Both options have pros and cons, so pick the best fit for your needs and budget.
- Measure and cut: Measure your roof and cut the underlayment to fit the dimensions. Remember, having a little extra is better than coming up short.
- Start at the bottom: Begin installing the underlayment at the bottom edge of the roof, working your way up. This ensures any water under the metal panels will flow off the roof without causing damage.
- Overlap and secure: Overlap the underlayment sections by a few inches to create a watertight barrier. Use roofing nails or staples to secure the underlayment to the roof sheathing, following the manufacturer’s recommendations.
- Cover the entire roof: Continue installing the underlayment, working from the bottom up and overlapping each layer until the entire roof is covered.
- Seal the seams: Apply roofing or seam tape over the overlaps to create a watertight seal.
With your underlayment in place, you’ve built a solid foundation for your metal roof.
Step 2: Install eave flashing
Now that your underlayment is in place, it’s time to install eave flashing. This crucial step helps protect your mobile home from water damage by directing water away from the roof and preventing it from seeping into your home. Ready to get started? Let’s dive into the world of eave flashing!
- Measure and cut: First, measure the length of your eaves – the roof’s lower edge. Cut the eave flashing to match those measurements, allowing for a slight overhang to ensure proper water runoff.
- Bend the flashing: Most eave flashing comes with a pre-formed bend, but you’ll need to create one if yours doesn’t. The bend should form an L-shape, with one side on the roof and the other extending over the edge.
- Align with the edge: Position the eave flashing along the roof’s lower edge, ensuring it lines up with the edge and overhangs slightly. This alignment is key to directing water away from your mobile home.
- Secure the flashing: Use roofing nails or screws to fasten the eave flashing to the roof sheathing. Space the fasteners about 12 inches apart and ensure they’re flush with the surface to prevent water from seeping in.
- Overlap the pieces: If your roof is longer than a single piece of flashing, you’ll need to overlap the sections by at least 2 inches. This overlap creates a watertight barrier and ensures water flows smoothly off the roof.
- Double-check with gutters: If you have gutters, ensure the eave flashing overlaps them. This ensures water is directed into the gutters instead of dripping behind them, which could cause damage.
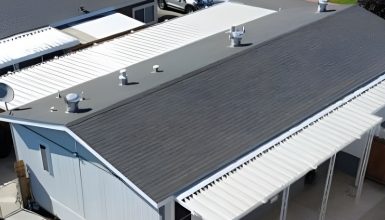
Step 3: Install metal panels
You’ve made it to the most exciting part – installing the metal panels! With your underlayment and eave flashing in place, it’s time to give your mobile home the gorgeous new roof it deserves. So, let’s get down to business and bring your vision to life!
- Start with a straight edge: Before you begin, use a chalk line to mark a straight edge along the bottom of your roof. This guide will help you align your metal panels and ensure a professional-looking installation.
- Place the first panel: Align the first metal panel with the chalk line and the edge of the eave flashing. Ensure the panel slightly overhangs the edge to allow for proper water runoff.
- Secure the panel: Fasten the panel to the roof sheathing using screws or nails, following the manufacturer’s recommendations for spacing and placement. Be sure to drive the fasteners through the raised portions of the panel, as this helps prevent leaks.
- Continue with more panels: Install the next panel by overlapping it with the first, according to the manufacturer’s instructions. This overlap creates a watertight seal and ensures a snug fit. Continue installing panels along the roof’s length, ensuring they align with the chalk line and are correctly overlapped.
- Trim as needed: If you need to trim a panel to fit your roof’s dimensions, use tin snips or metal shears to make a clean cut. Wear gloves and eye protection, as metal edges can be sharp.
- Repeat on the other side: Once you’ve completed one side of the roof, move on to the other side and repeat the process. Be sure to maintain proper alignment and overlap for a seamless finish.
- Install ridge cap: After all the panels are in place, install a ridge cap along the roof’s peak to cover the seams and provide a professional look.
Step 4: Install ridge cap and flashing
You’re almost there! With those gorgeous metal panels in place, it’s time to add the finishing touches – installing the ridge cap and flashing. These essential components give your roof a polished, professional look and protect your mobile home from water damage and leaks. So, let’s wrap up this project in style!
- Prepare the ridge cap: Start by measuring the length of your roof’s peak and cutting the ridge cap to fit. Be sure to allow for a slight overhang on each end for proper water runoff and a seamless finish.
- Align the ridge cap: Position it along the peak of your roof, ensuring it covers the seams where the metal panels meet. This placement provides a watertight seal and adds extra protection against the elements.
- Secure the ridge cap: Use roofing screws or nails to fasten the ridge cap to the metal panels, following the manufacturer’s recommendations for spacing and placement. Ensure the fasteners are driven through the raised portions of the ridge cap and panels to minimize the risk of leaks.
- Install additional flashing: Now, it’s time to install flashing around any roof penetrations, such as vents, pipes, or chimneys. Cut the flashing to fit around these features, and use roofing sealant to create a watertight seal between the flashing and the metal panels.
- Secure the flashing: Fasten the flashing to the roof using screws or nails, driving the fasteners through the raised portions of the flashing and panels. This technique helps prevent leaks and ensures a snug fit.
- Seal the edges: Apply a bead of roofing sealant along the edges of the flashing and the ridge cap to create a watertight seal. This extra step adds an additional layer of protection against water damage.
And there you have it! With your ridge cap and flashing securely in place, your mobile home now boasts a stunning, weather-resistant metal roof that’s as functional as it is stylish.
Step 5: Seal the seams
You’re in the home stretch now! With your metal panels, ridge cap, and flashing installed, there’s just one more step to ensure your roof is watertight and ready to withstand the elements: sealing the seams. This crucial step adds an extra layer of protection against leaks. It helps your roof stand up to even the harshest weather conditions. So, let’s seal the deal on this fantastic project!
- Inspect the seams: Begin by examining the seams where the metal panels overlap and the edges of the ridge cap and flashing. Ensure everything is properly aligned and secured, with no gaps or loose areas.
- Choose the proper sealant: Select a high-quality, weather-resistant sealant designed specifically for metal roofing. This type of sealant is formulated to adhere well to metal surfaces and provide long-lasting protection against leaks.
- Clean the seams: Before applying the sealant, make sure the seams are clean and free of dirt, debris, or moisture. A clean surface ensures the sealant will bond well to the metal and create a watertight seal.
- Apply the sealant: Using a caulking gun or a brush, apply a generous bead of sealant along the seams, covering the entire overlap length. Be sure to follow the manufacturer’s instructions for proper application and coverage.
- Smooth the sealant: Use a putty knife or your finger (wearing a glove) to smooth the sealant, ensuring even coverage and a tight seal. This step helps the sealant bond to the metal and provides a seamless, professional finish.
- Inspect your work: Once the sealant is applied, take a moment to inspect your work and ensure all seams are covered and sealed. If you spot gaps or missed areas, apply more sealant as needed.
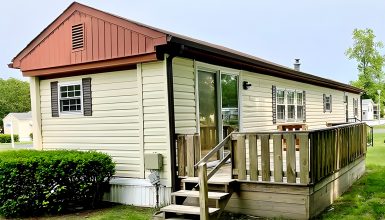
Congratulations! With your seams expertly sealed, your mobile home now sports a durable, weather-resistant metal roof that’s as beautiful as it is functional.
