
Painting your mobile home walls can transform your space in a snap. But wait, you’ve got vinyl walls, not drywall. No worries! You can turn those walls into a canvas for creativity with the right approach. Trust me, it’s easier than you think. Let’s dive in!
Steps | Summary | Tips |
Vinyl walls in mobile homes are often different than drywall. They require special care. | Know your wall. Test a small, hidden area before diving in. | |
Gather all necessary materials: paint, primer, painter’s tape, rollers, and brushes. | Use a checklist. Missing something in the middle of painting is a no-go. | |
Clean the walls thoroughly. Sand if necessary. Tape off edges and fixtures. | Use TSP (Trisodium Phosphate) for heavy cleaning. Always wear safety gear. | |
Apply a thin, even layer of primer designed for vinyl or plastic surfaces. | Let the primer dry completely before painting. | |
Use acrylic or latex paint and apply with a roller for large areas and a brush for edges. | Work in sections. Start from the top and move downwards. | |
Allow first coat to dry according to the can’s instructions. Assess need for second coat. | For a smoother finish, consider sanding lightly between coats. | |
Remove painter’s tape, perform any touch-ups, and reinstall fixtures and décor. | Remove tape at a 45-degree angle to keep lines clean. | |
Clean walls with mild soapy water. Store leftover paint for touch-ups. | Keep room ventilated until fumes dissipate. |
Mobile Home Vinyl Walls
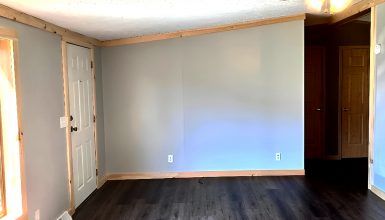
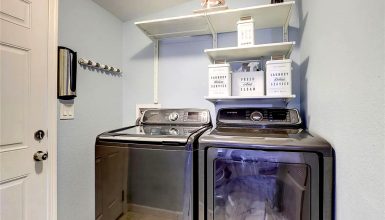
Alright, let’s talk vinyl walls. They’re not your run-of-the-mill drywall, and that’s a good thing! You see, vinyl walls in mobile homes are often coated with a ‘wallpaper’ finish. It’s part of what makes mobile homes so affordable. But here’s the kicker: this finish can be a bit of a diva when it comes to paint.
So why does vinyl act so differently? It’s all about the material. Vinyl is a type of plastic. It’s slick, smooth, and non-porous. Paint has a hard time sticking to it. Imagine trying to put a sticker on a wet surface. It’ll peel right off, right? That’s what happens when you slap regular paint onto vinyl walls without prepping first.
Another thing to consider is temperature. Your mobile home might face extreme summer heat or chilly temperatures in winter. These fluctuations can make vinyl walls expand and contract a bit. The good news is that the right paint can roll with these punches.
Now, don’t let any of this scare you away. Once you understand the quirks of vinyl, you can play by its rules. Prime it right, choose the right paint, and you’ll have walls that wow in no time. So, are you ready to get the lowdown on how to make your vinyl walls fabulous? Let’s get to it!
Preparing for the Project
So, you’re pumped and ready to turn those vinyl walls into something magazine-worthy. Awesome! But hold on, before we dive into the actual painting, there’s some prep work we’ve got to tackle. Preparation is the unsung hero of any successful paint job, trust me.
Tools and Materials
First up, tools and materials. What do you need? A few basics. You’re looking at paint rollers, a couple of paint trays, and a quality paintbrush for those tricky corners. Don’t forget painter’s tape for clean edges and drop cloths for your floors. Oh, and let’s not skimp on primer; you’ll want a good one designed for vinyl.
Initial Steps
Next, you will want to give those walls a good clean. Yep, even if they look clean, a wipe-down is crucial. A simple mix of water and mild soap will do. Why? You want to remove any grease, dirt, or cobwebs. Your paint needs a clean surface to adhere to, plain and simple.
Time to remove any wall fixtures. Remove those picture frames, unhook that artsy wall clock, and unscrew the outlet covers. Store them safely; you’ll put them back up later.
Finally, grab that painter’s tape and get taped. Cover the edges of the wall, the baseboards, and any outlets or switches. The tape ensures you get those super-straight lines that make the result look pro-level.
Have you got all that? Great, you’re ready to move on to the fun part: painting those walls! Let’s get this transformation started!
Step-by-Step Guide Painting Mobile Home Walls
You’ve got your eyes on the prize: those vinyl walls aren’t going to know what hit them! Ready to dive in? This step-by-step guide will walk you through the nitty-gritty. Buckle up!
Step 1: Surface Preparation
We’ve got our tools, and our walls are sparkling clean. Now, let’s talk about surface preparation. This step sets the stage for everything that follows. So, no cutting corners!
First things first: Take a close look at your walls. Feel them. Are they smooth or a bit gritty? Sometimes, older vinyl walls have textures that might require a little sanding. Grab a fine-grit sandpaper and lightly go over any bumps or rough spots. Easy does it; you’re not carving a sculpture, just smoothing things out.
Sanding done? Perfect. Now, wipe down the walls with a damp cloth to remove any dust. You want a clean canvas for your masterpiece.
Let’s talk holes or dings. Got any? It happens. No wall is perfect. Grab some spackle and fill those in. Smooth it out and let it dry. A quicksand over the spackle, and voila, like it never happened.
Now, why are we doing all this? Well, paint is kind of like the frosting on a cake. If the cake is lumpy or has holes, the frosting won’t look good, no matter how tasty. The same goes for paint on your walls. Prepping the surface ensures you get that sleek, professional look when you’re done.
And that’s it for surface preparation! Your walls should be smooth, clean, and ready for action. Next up: priming. But hey, one step at a time, right? Let’s make sure we nail this part first.
Step 2: Primer Application
Great job on the surface prep! Now your walls are as ready as you are. Next up, primer. Think of primer as the base coat for your nails. It sets the stage for what’s to come and ensures the color pops. Plus, it makes sure the paint sticks like glue. So, how do we get started?
First, let’s talk about primer choices. Remember, you’ve got vinyl walls, not your average drywall. So, you need a primer that can bond with that vinyl surface. Look for a primer labeled for ‘plastic’ or ‘vinyl.’ It’s a must!
Got your primer? Awesome. Pour it into a paint tray. Grab your roller, dip it in, and let’s roll! Start from the top and work your way down. Why top-down? Because if any drips happen, you can smooth them out as you go along. Genius, right?
For those hard-to-reach spots and corners, grab a smaller brush. Be sure to get every nook and cranny. Consistency is key, so ensure you’re applying an even layer.
Okay, one coat is done. Take a step back. Look good? It should be even, with no streaks or spots. Let it dry. How long? Check the primer’s instructions. Each brand has its own drying time, but you usually look at a few hours.
Once it’s dry, touch the walls. Feel smooth? No tackiness? Then you’re golden. If it feels a bit sticky, give it more time. Patience is the name of the game.
And that’s primer, folks! You’ve laid the groundwork for some stunning walls. Next, we dive into the main event: painting.
Step 3: Painting
Here we are, folks, the main event: painting! This is where the magic happens. Your primer is down, and your walls beg for some color. Are you ready to bring this vision to life? Let’s dive in!
First off, choose your paint. Now, not just any paint will do. Remember, we’re working with vinyl. Look for something that says “acrylic” or “latex” and is interior-grade. These paints are flexible to expand and contract your mobile home walls. Trust me, you want this.
Alright, let’s pop that paint can open! Ah, the smell of possibility. Pour the paint into a clean tray, and grab your roller. You will use the same top-down technique you mastered with the primer. So start at the top, and let’s get rolling—literally!
As you work your way down, watch for drips or roller marks. If you spot any, smooth them out immediately. The key is even coverage. Consistency elevates this from a DIY job to something straight out of a magazine.
Oh, and those corners? That’s where your handy paintbrush comes in. Just like with the primer, use the brush to get into the nooks and crannies. No spot left behind, right?
Step 4: Drying and Second Coat
High fives all around! You’ve finished that first coat, and your walls look like a better world. But we’re not across the finish line just yet. Up next: drying and possibly a second coat. This step is crucial, so let’s get it right.
First, let’s talk drying. Take a look at your paint can. There’s a drying time listed there. Stick to it. No shortcuts. If it says four hours, give it four hours. What to do while waiting? Grab a snack, take a walk, or binge-watch your favorite show. Time will fly.
So, how do you know it’s dry? Simple. Touch it. If it’s smooth and not tacky, you’re good to go. If it feels a bit sticky, give it more time. Better safe than sorry.
Now, the million-dollar question: Do you need a second coat? Walk around. Check your walls in different lights. Look for any uneven spots or areas where the old color peeks through. If everything looks solid, you might just be done. But if you see inconsistencies, roll up those sleeves; it’s second coat time.
Repeat all the steps from your first painting round for the second coat. Again, top to bottom, watch for drips, smooth everything out. This coat is your insurance policy. It ensures that your walls look uniformly fantastic. Once done, let it dry again, following the guidelines.
And there you have it! Once that second coat is dry, you’ve officially transformed your vinyl walls. Pat yourself on the back; you’ve nailed it! Ready for the finishing touches? Onward we go!
Step 5: Finishing Touches
Bravo, you’re almost there! Your walls are painted, your space feels brand new, and you’re probably proud. You should be! But before you break out the bubbly, we’ve got a few finishing touches to add. Let’s make sure this masterpiece is complete, shall we?
First off, the painter’s tape. Remember how carefully you placed it? It’s done its job, giving you those razor-sharp edges. Now, it’s time to remove it. Here’s a tip: peel it off at a 45-degree angle. This way, you won’t risk messing up your fresh paint.
Okay, the tape’s off. Take a step back. How’s it looking? Are the edges clean? If you see any minor imperfections, this is your moment for touch-ups. Just dab a little paint on a small brush and fix those spots. Remember, the devil’s in the details.
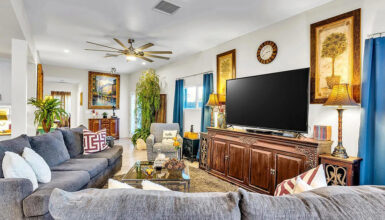
Last, let’s talk about fixtures and decor. It’s time to put them back up. Screw in the outlet covers, hang those frames and re-hook your wall clock. Only this time, they’ll be sitting against your brand-new backdrop. Talk about a transformation!
So there you have it. You’ve painted your vinyl walls and added the finishing touches and your mobile home looks like something out of a magazine. Cheers to you and your newfound designer skills!
Post-Painting Care
Okay, the brushes are down, the paint has dried, and you’re basking in the glory of your revamped space. It’s a vibe! But wait, let’s chat about keeping this dreamy look in tip-top shape. Yep, your walls need a little TLC post-painting, too.
First, let’s talk cleaning. Life happens, right? Maybe a spaghetti sauce splatter or tiny handprints will find their way onto your walls. No stress. Grab a soft cloth and some warm, soapy water. Gently wipe away any marks. Avoid scrubbing like sanding wood; you don’t want to damage that gorgeous paint.
Now, how about touch-ups? Despite our best efforts, little nicks or scuffs can appear over time. For these moments, keep some of your paint in a small, airtight container. A quick dab here and there, and it’s like it never happened.
What about the leftover paint? Don’t just shove it in the back of a closet and forget about it. Store it properly. Keep the lid tight and keep it in a cool, dry place. You’ll thank yourself later when it’s time for those touch-ups or if you decide to add another room to your paint project list.
Last but not least, air it out. Fresh paint can sometimes mean lingering fumes. Keep the windows open or set up some fans to move the air. This is especially important if you’ve got kiddos or pets around.
Conclusion
You did it! Your mobile home’s vinyl walls have gone from drab to fab, and you’re the hero of this transformation story. From prep work to those last chic finishing touches, you’ve shown that a dash of color and a little elbow grease can work wonders.
