
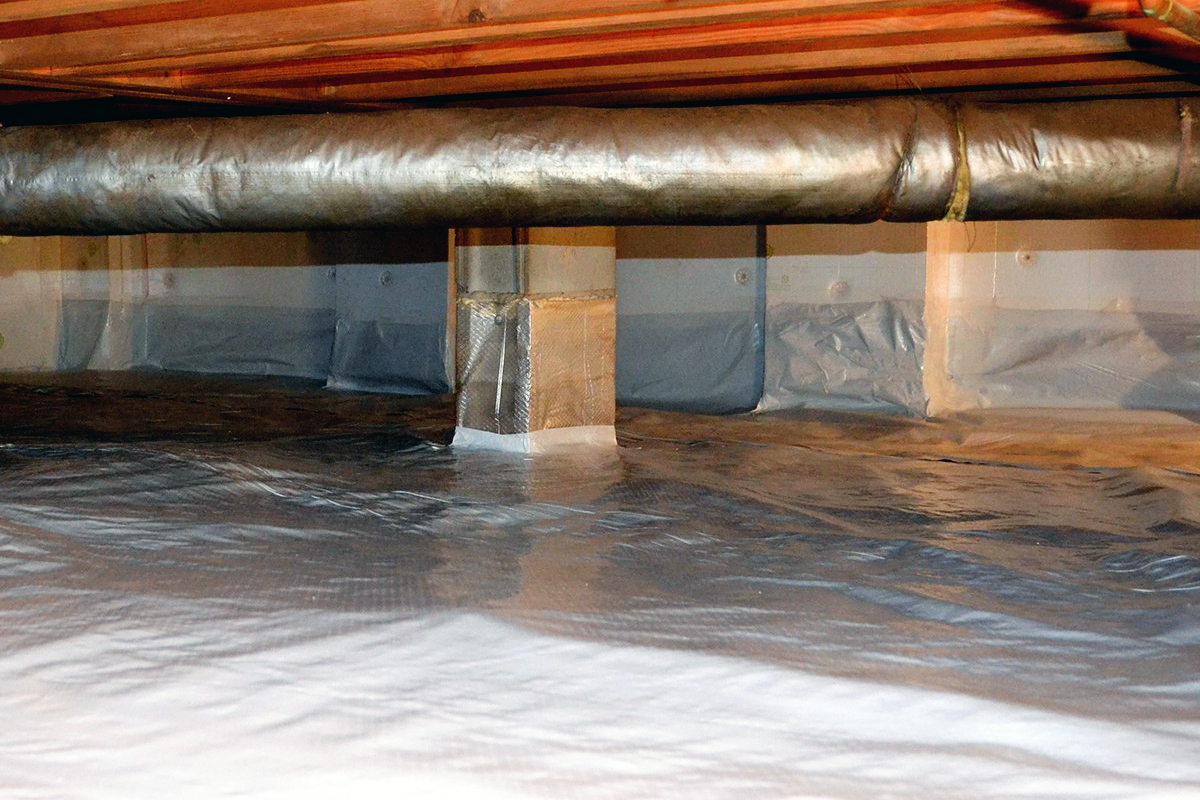
A vapor barrier is vital to your mobile home’s ecosystem, and its importance can’t be overstated. Picture your mobile home as a human body, with the vapor barrier acting as its skin. Just as our skin protects us from harmful elements and regulates body temperature, a vapor barrier prevents moisture from seeping into your home and causing unwanted damage. Moisture is a notorious villain, leading to issues like mold, mildew, and structural decay. In essence, a well-installed vapor barrier keeps your mobile home dry, comfy, and structurally sound.
Types of Mobile Home Vapor Barrier
Let’s dive into the fabulous world of vapor barriers, exploring each option’s strengths and unique features.
1. Polyethylene plastic sheeting
First up is our trusted friend, polyethylene plastic sheeting. This common choice is both robust and flexible. Think of it as the denim jeans of vapor barriers – tough, durable, and perfect for an active environment. It’s water-resistant, making it a top-notch line of defense against moisture.
2. Foil-faced kraft paper
Next, we have foil-faced kraft paper. This material is the mystery novelist in our lineup – a bit unusual, but with plenty of intriguing features. Kraft paper is lined with aluminum foil, adding an extra layer of moisture protection. Plus, it has the bonus of being an excellent insulator. So, if you’re in a chilly climate, foil-faced kraft paper might be your perfect match!
3. Aluminum foil
Aluminum foil is another contender. It’s the eco-friendly warrior of our group, as it’s highly recyclable. Like a suit of armor, it offers a solid barrier against moisture. It’s easy to install and works well in tight spaces, too. If you’re a fan of sustainable living, aluminum foil could be your go-to.
4. Spray foam
Finally, let’s chat about spray foam. The modern artist of our group, spray foam, is versatile and efficient. It fills in gaps and crevices, providing an airtight seal. Plus, it offers fantastic insulation. Spray foam might be a bit more pricey than the others, but it’s a heavy hitter in performance.
Mobile Home Vapor Barrier Thickness
In the world of vapor barriers, it’s not just about what material you use but also how thick it is. Imagine you’re wrapping a gift. You wouldn’t want to use thin paper that tears easily, right? Similarly, the thickness of a vapor barrier is all about providing that robust line of defense your mobile home needs.
In the big leagues of vapor barriers, thickness is usually measured in ‘mils.’ Now, don’t mistake this for millimeters. One mil is actually just 0.001 inch. So, if you see a 6-mil vapor barrier, it’s 0.006 inches thick. It’s like the thread count in your sheets – the higher the number, the thicker, and usually, the better the quality!
A good benchmark? Aim for a vapor barrier that’s 6 mils or thicker. It will provide a solid defense against moisture. Suppose you’re in an area with high humidity or harsh weather conditions. In that case, you might consider going up to 10 or 12 mils. It’s like bundling up in a cozy winter coat to brave the cold!
One key tip: don’t skimp on thickness. While a thicker vapor barrier might cost a little more, it can save many potential repair costs. It’s all about thinking long-term!
How to Choose the Best Vapor Barrier for Mobile Homes
Time to put on your detective hat because choosing the best vapor barrier for your mobile home is all about investigation and evaluation.
- Environment
Step one, scope out your environment. What’s the weather like in your area? If you’re dealing with cold winters, a vapor barrier with good insulation properties, like foil-faced kraft paper or spray foam, might be your best bet. Are you living in a rainforest-esque region? Go for the heavyweight champ in water resistance, the polyethylene plastic sheeting.
- Budget
Next, check your budget. While we all love a good splurge, being realistic about what you can spend is essential. Polyethylene plastic sheeting and aluminum foil are generally more wallet-friendly, while spray foam might require more investment.
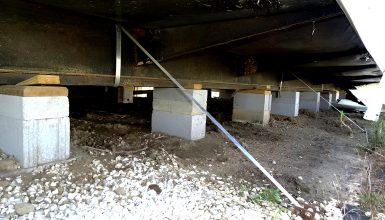
- Underbelly
Now, it’s time to inspect your mobile home. Peek under your home and look at the lay of the land. If it’s filled with nooks and crannies, spray foam, with its gap-filling superpower, could be a great fit. Got a pretty straightforward underbelly? You might opt for polyethylene or aluminum foil.
- Installation
Finally, let’s talk about installation. Are you a DIY enthusiast or more of a ‘let the pros handle it’ type? If you’re going for a DIY project, polyethylene and aluminum foil are easier to handle. But, if you’re hiring professionals, any of these options could work.
Calculating How Much Vapor Barrier You Need
Break out those calculators, folks. It’s math time! But don’t worry. It’s as easy as a summer lemonade stand.
First, grab a tape measure, and let’s figure out the size of your mobile home. Measure the length and width, then multiply these two numbers together. That’s your total square footage. If your home is 70 feet long and 14 feet wide, you will calculate 70 x 14 to get 980 square feet.
When buying a vapor barrier, you’ll see that it’s sold in rolls, and the label tells you how many square feet each roll covers. Your job is to ensure you’ve enough to cover your whole home, with a little extra for good measure (think of it as a safety net for any miscalculations or mistakes).
Let’s say you’re working with a single-wide mobile home, typically about 18 feet wide and 90 feet long. That’s a total of 1620 square feet. Now, suppose your vapor barrier roll covers 1200 square feet. In that case, you’ll need two rolls with some leftovers for tricky spots or unexpected patches.
But let’s kick things up a notch. For a double-wide mobile home, say 36 feet wide and 90 feet long, you’re looking at 3240 square feet. With our 1200 square feet roll of the vapor barrier, you will need three rolls and a portion of a fourth.
Remember, having a little extra vapor barrier is always better than running out mid-project. Think of it like going on a road trip. You don’t want to get halfway there and realize you forgot to pack snacks, right?
Vapor Barrier Installation
Time to roll up your sleeves, folks! We’re diving into installing a vapor barrier in your mobile home. Don’t worry. You’ll tackle this project like a pro with some preparation and patience.
Tools
First off, gather your tools. You’ll need a staple gun, utility knife, tape measure, safety goggles, and gloves. Remember, a well-prepared DIYer is a safe DIYer!
Step 1
Next, let’s prep the site. It means cleaning your mobile home’s underbelly and removing debris or sharp objects. This step is like setting the table before dinner. A clean start leads to a smoother process.
Step 2
Now, it’s game time! Roll out your vapor barrier. If you’re using a roll, start at one end of your mobile home and roll it across the length, securing it as you go with your trusty staple gun. Imagine you’re unrolling a red carpet, but instead of celebrities, it’s your mobile home getting the VIP treatment!
Step 3
Ensure the vapor barrier is tight and secure. It’s like tucking in a bedsheet; you don’t want any slack that could lead to sagging or damage later on.
Step 4
If your mobile home is wide, you might need to install more than one row of vapor barriers. When you do, ensure the rows overlap by at least 6 to 12 inches. It creates a continuous protective layer against moisture. Think of it as linking arms with your friends – the overlap is about staying connected!
Step 5
Once the vapor barrier is installed, it’s time for the finishing touch. Seal the seams with moisture-resistant tape to keep them airtight. It’s like sealing an envelope before mailing it off. This final step is your secret weapon against moisture seeping in.
Vapor Barrier Replacement Costs
Let’s start with a single-wide mobile home. For example, we’ll use a home about 18 feet wide and 90 feet long. The vapor barrier we’ll choose is a middle-of-the-road option, polyethylene, which might cost around 20 cents per square foot. Multiply 1620 square feet (the size of the mobile home) by 20 cents, and we get $324 for materials.
But we can’t forget labor costs! If you’re going the DIY route, you can skip this part. But if you’re hiring a professional, you could look at about $1 to $2 per square foot for labor. Let’s say it’s $1.50, which means you’ll be shelling out another $2,430. Add that to your material costs, and you’re looking at a total of around $2,754.
Now, let’s jump to a double-wide mobile home, about 36 feet wide and 90 feet long. You’re looking at $648 in material costs using the same material. And if you’re hiring a professional at $1.50 per square foot, that’s $4,860 in labor costs. Add them up, and your total is around $5,508.
Remember, these are just estimates. Prices can vary based on your location, the job’s complexity, and the professionals you hire. Always do your research and get a few quotes before you commit.
Conclusion
Choosing the best vapor barrier is like picking out the perfect outfit. It’s all about understanding your needs, environment, and budget. But remember, whatever choice you make, a well-installed vapor barrier is your ticket to a cozy, dry, and long-lasting mobile home.

