
A well-installed air conditioner can transform your mobile home into a haven of relaxation and refreshment. But it’s not just about comfort—proper installation also ensures your AC runs efficiently, saving you money on energy bills. Also, it keeps your home safe from water damage or other hazards. So, let’s get started and make your mobile home the coolest place to be!
Preparing for Installation
Are you ready to install that window AC unit and enjoy a cool, comfy mobile home? Great! But before diving into the installation process, let’s ensure we’re prepared. Proper preparation is key to a smooth, successful installation, so follow these steps to set yourself up for success:
- Window AC unit
Start by picking the right window AC unit for your mobile home. Consider the size, cooling capacity, and energy efficiency to ensure the best fit for your space. Don’t forget to measure your window to ensure the unit fits perfectly!
- Gather your tools
Now that you’ve got your AC unit, it’s time to assemble your tool kit. You’ll need a screwdriver, measuring tape, level, and any hardware included with your AC unit. It’s also a good idea to have some foam insulation or weatherstripping on hand to seal any gaps after installation.
Before you begin:
- Keep safety in mind.
- Review the AC unit’s manual to familiarize yourself with the installation process and any specific safety precautions.
- Make sure your workspace is clean and clutter-free to avoid any accidents.
With these preparations, you can tackle the installation like a pro. So, let’s roll up our sleeves and work on creating that cool and comfortable mobile home oasis!
Selecting the Right Window
Now that you’re all set with the right AC unit and tools, it’s time to pick the perfect window for installation. But don’t worry—we’re here to help you make the best choice! Follow these tips to select the right window for your new air conditioner:
- Window type
First, ensure the window you choose is compatible with your AC unit. Most window air conditioners are designed for standard double-hung windows open vertically. Suppose you have a different window type, like a casement or sliding window. You might need a special AC unit or adapter kit in that case.
- Room location
Consider the room you want to cool when selecting a window. Ideally, choose a window in a central area of the room or near where you spend the most time. It helps ensure efficient cooling and optimal comfort.
- Sunlight exposure
Windows that receive direct sunlight can make your AC unit work harder to cool the room. If possible, choose a window that’s shaded or gets less direct sunlight to boost energy efficiency.
- Outlet proximity
Don’t forget to check for a nearby electrical outlet! Your AC unit will need a reliable power source, so ensure an outlet within reach of the unit’s power cord.
- Obstructions and airflow
Make sure there are no obstacles near the window that could block the airflow from your AC unit. Inside, keep furniture and curtains away from the unit. While outside, clear away plants or debris that might interfere with airflow.
Considering these factors when selecting a window for your air conditioner, you’ll set the stage for a smooth installation and a comfortable, cool mobile home. So, let’s move on to the next step and install that AC unit!
A Step-by-Step Guide to Installing a Mobile Home Window AC Unit
You’ve got your tools, the perfect window, and a top-notch AC unit—now it’s time for the main event: installing your window air conditioner! Don’t worry. We’ll walk you through the process step by step. Just follow along, and you’ll have a cool mobile home soon!
Step 1: Prepare the window
First, clean your window and sill well to ensure a secure fit for the AC unit. If your unit has mounting brackets, install them according to the manufacturer’s instructions.
Step 2: Assemble the AC unit
Before you lift the unit into the window, attach any side panels or accordion panels included with your air conditioner. Make sure the air filter is in place, too!
Step 3: Position the unit
Now comes the heavy lifting—literally! Carefully lift your AC unit and place it on the window sill. Ensure the unit’s bottom lip rests securely on the mounting brackets or window sill. Use a level to ensure the unit is slightly tilted toward the outside to allow proper drainage.
Step 4: Secure the AC unit
Once your air conditioner is in place, lower the window sash onto the top of the unit. Lock the sash in place to prevent movement. Use foam insulation or weatherstripping to seal gaps between the sash and the AC unit. It helps keep drafts and bugs out while improving energy efficiency.
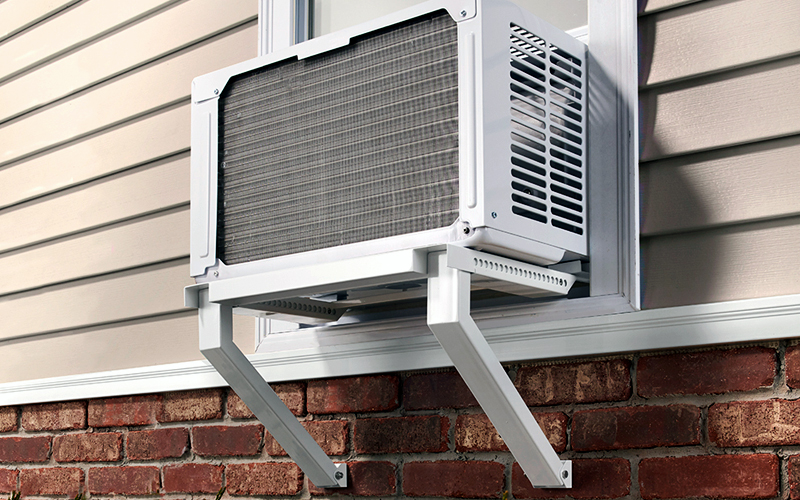
Step 5: Add support (if needed)
If your AC unit is large or heavy, you might need to install support brackets on the exterior wall beneath the unit. Follow the manufacturer’s recommendations to ensure safe and secure installation.
Final Steps and Testing
You’re almost there! With your window AC unit securely installed, it’s time for the final steps and testing to ensure everything works just right. Let’s wrap up the installation process and start enjoying that cool, refreshing air!
- Plug it in
Carefully plug the AC unit’s power cord into a nearby electrical outlet. Ensure the outlet is grounded correctly and can handle the unit’s electrical requirements. If you’re unsure, consult an electrician for guidance.
- Test it out
Turn on your new window air conditioner and let it run for a few minutes. Listen for any unusual noises and observe how it’s cooling the room. Ensure the air is blowing cold and the unit operates as expected.
- Check the controls
While the AC unit runs, test the different settings and features, such as temperature adjustments, fan speeds, and energy-saving modes. It will help you familiarize yourself with the controls and ensure everything functions properly.
- Inspect for leaks
After running the unit, look around the window and AC unit to check for air or water leaks. If you notice any gaps or issues, use weatherstripping or foam insulation to seal them up and improve efficiency.
Congratulations! You’ve successfully installed and tested your window AC unit. Now, sit back, relax, and enjoy the cool comfort of your mobile home, knowing you’ve mastered the installation process like a pro!
Troubleshooting Common Issues
Encountering issues during or after your window AC unit installation can be frustrating, but don’t worry—we’ve got you covered! Let’s explore some common problems and their solutions to help you troubleshoot like a pro:
- The AC unit isn’t turning on.
Check to make sure the power cord is securely plugged into the outlet. Verify that the outlet is functioning by plugging in another device to test it. Ensure that any circuit breakers or fuses associated with the outlet haven’t tripped or blown.
- The AC unit isn’t cooling effectively.
Check the thermostat settings and ensure they’re set to an appropriate temperature. Make sure the air filter is clean and properly installed. A dirty filter can restrict airflow and impact cooling performance. Inspect the unit’s exterior for any debris or obstructions blocking the airflow.
- AC unit is making unusual noises.
Inspect the window and AC unit for any loose parts, such as screws or panels, and tighten them if necessary. Verify that the unit is level and securely installed. An uneven or improperly mounted unit can cause vibrations and noise.
- Water is leaking from the unit.
Ensure the unit is slightly tilted toward the outside for proper drainage. Inspect the drainage hole or condensation pan for any blockages and clear them if needed.
- AC unit is cycling on and off too frequently.
Make sure the thermostat settings are appropriate for the room’s temperature. Check the air filter and clean or replace it if necessary. Verify that the unit’s cooling capacity is suitable for the size of the room. An undersized or oversized unit may struggle to maintain a consistent temperature.
Remember, it’s always a good idea to consult your AC unit’s manual for specific troubleshooting advice related to your model. If you’re still having trouble or unsure how to resolve an issue, don’t hesitate to contact a professional HVAC technician for help.
Maintenance and Care Tips
Now that your window AC unit is running let’s talk about keeping it in tip-top shape! Regular maintenance and care are essential for prolonging your air conditioner’s life and ensuring it keeps your mobile home cool and comfortable. So, let’s dive into some simple yet effective maintenance tips:
- Clean the air filter
A clean air filter is vital to efficient cooling. Make it a habit to check your filter every month and clean or replace it as needed. A dirty filter can restrict airflow and reduce your AC unit’s performance, so keeping it clean is necessary!
- Inspect the exterior
Regularly inspect the exterior of your AC unit for any debris, dirt, or blockages. Ensure the outdoor coil is free of dust, leaves, or other obstructions that could impact airflow and efficiency.
- Keep the area clear.
Maintain a clear space around your window AC unit, inside and outside. Avoid placing furniture, curtains, or objects too close to the unit. Keep plants, bushes, or other debris away from the outside coil.
- Seal gaps and leaks
Periodically check the window and AC unit for any air or water leaks. If you notice any gaps, use weatherstripping or foam insulation to seal them up and improve efficiency.
- Schedule regular check-ups
Just like a car, your AC unit can benefit from professional tune-ups. Consider scheduling an annual maintenance visit with an HVAC technician to inspect your unit, clean and lubricate components, and address any potential issues before they become significant problems.
Conclusion
And there you have it—mastering mobile home comfort with your new window AC unit is a breeze! Following this step-by-step guide, you’ve installed your air conditioner like a pro and learned how to keep it in peak condition for years. Thank you for reading!